Tuesday, November 28, 2023

Password Reset process in Active Directory:-

 Password synchronization across all domain controllers in an Active Directory (AD) environment occurs through the replication mechanisms that are inherent to the AD infrastructure. When a user changes or updates their password, the change is processed by the domain controller (DC) where the password change request is made. Here's a high-level overview of the process:

  1. Password Change Request:

    • A user initiates a password change, typically through a domain-joined computer, a web portal, or any other authenticated means.
  2. Authentication and Authorization:

    • The request is authenticated and authorized by the domain controller where the change is requested.
  3. Password Change Processing:

    • The domain controller processes the password change request and updates the user's password information in its own Active Directory database.
  4. Replication:

    • The changed password information is then replicated to other domain controllers within the same AD forest. Replication ensures that the updated password information is propagated to all DCs.
  5. Multi-Master Replication:

    • Active Directory operates on a multi-master replication model, meaning that changes can be made on any domain controller. All domain controllers in a domain are writable, and they replicate changes to each other.
  6. Change Notification:

    • Replication in AD is event-driven, and it uses a change notification mechanism. When a change occurs, the domain controller generates a change notification, and this notification is sent to other domain controllers.
  7. Update on Other Domain Controllers:

    • Upon receiving the change notification, the other domain controllers process the update, and the password change is reflected in their respective AD databases.
  8. Time to Live (TTL):

    • Password changes have a "Time to Live" (TTL) associated with them. This TTL is used to prevent replication storms by specifying how long the change information should be considered valid.

By leveraging the replication capabilities and the multi-master model of Active Directory, password changes are efficiently synchronized across all domain controllers. The synchronization process ensures that users can authenticate with any domain controller using their updated credentials.

It's important to note that this process is integral to the design of Active Directory and is transparent to end-users. Additionally, replication can take a short amount of time, depending on factors such as network latency, the size of the directory, and the replication interval settings. In most cases, the replication is fast enough that users can use their updated passwords across the entire domain almost immediately.


Enjoy!!

Metadata cleanup of a failed domain controller in Active Directory

 Performing metadata cleanup is an important step when you need to remove the remnants of a failed or decommissioned domain controller from Active Directory. Here are the steps to perform metadata cleanup:

Using Active Directory Users and Computers Snap-in:

  1. Ensure that the failed domain controller is not online or reachable.

  2. On a domain controller or a computer with the Remote Server Administration Tools (RSAT) installed:

    • Open "Active Directory Users and Computers" (ADUC).
    • Make sure that "Advanced Features" is enabled from the "View" menu.
  3. In ADUC, navigate to the following path:

    • Domain > System > Domain Controllers
  4. Right-click on the failed domain controller object, and select Delete.

Using Ntdsutil:

  1. Open a command prompt on a domain controller.

  2. Type the following command:


    ntdsutil
  3. At the ntdsutil: prompt, type:


    metadata cleanup
  4. At the metadata cleanup: prompt, type:


    remove selected server <FailedDCName>

    Replace <FailedDCName> with the name of the failed domain controller.

  5. Confirm the removal by typing:


    quit

Using Active Directory Sites and Services Snap-in:

  1. Open "Active Directory Sites and Services" (ADSS).

  2. Navigate to the following path:

    • Sites > Default-First-Site-Name > Servers
  3. Right-click on the failed domain controller, and select Delete.

Verify DNS Records:

Ensure that DNS records associated with the failed domain controller are removed manually.

Cleaning up Metadata for Demoted Domain Controllers:

If the failed domain controller was properly demoted before it failed, you might need to perform additional cleanup in the ADUC and ADSS tools.

Final Steps:

  1. Check for any remaining references in DNS and remove them.

  2. Monitor the event logs on other domain controllers for any errors related to the removed domain controller.

  3. Run dcdiag and repadmin /replsummary to ensure that the domain controllers are replicating properly.

Remember, these steps should be performed with caution. Always have a backup before making changes to your Active Directory infrastructure, and consider consulting with your IT team or a domain expert if you are unsure about any step.

Monday, November 27, 2023

"Stopped deletion threshold exceeded" Error in Azure AD Connect


This topic describes how to prevent "Accidental Deletes" feature in Microsoft Entra Connect.

in Azure AD connect , to prevent accidental deletes is enabled by default and configured to not allow an export with more than 500 deletes. This feature is designed to protect from accidental configuration changes and changes to your on-premises directory that would affect many users and other objects.


if anyone unknowingly deleted the AD objects, you may check that by following below steps: 

  1. Start Synchronization Service from the Start Menu.
  2. Go to Connectors.
  3. Select the Connector with type Microsoft Entra ID.
  4. Under Actions to the right, select Search Connector Space.
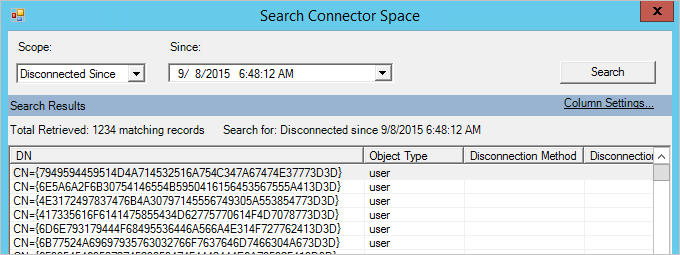
  5. In the pop-up under Scope, select Disconnected Since and pick a time in the past. Click Search. This page provides a view of all objects about to be deleted. By clicking each item, you can get additional information about the object. You can also click Column Setting to add additional attributes to be visible in the grid.

Search Connector Space

If you really want to delete the objects, follow the below steps: 

If all the deletes are desired, then do the following:

  1. To retrieve the current deletion threshold, run the PowerShell cmdlet 
  2. Get-ADSyncExportDeletionThreshold. The default value is 500.
  3. To temporarily disable this protection and let those deletes go through, run the PowerShell cmdlet: Disable-ADSyncExportDeletionThreshold.
  4. Run Initial Sync: Start-ADSyncSyncCycle -PolicyType Initial.
  5. To re-enable the protection, run the PowerShell cmdlet: Enable-ADSyncExportDeletionThreshold -DeletionThreshold 500


That is all!